


How to decorate a Valentine’s Day card with flowers
When Valentine’s Day comes around, there’s no more popular gift than fresh flowers. Many of us receive or send flowers on this day which means that florists are extremely busy. That said, if you wish to send a bouquet to somebody, you also normally include a card with a special message. You can carry the floral theme over to the card too by decorating your Valentine’s Day card with flowers and make it both personal and that much more special! It’s so easy to pick up or order flowers online but taking the time to make your own floral card to go with the bouquet shows that you took the time and put in real effort for that special somebody.
What you need:
– Firm piece of paper or cardboard
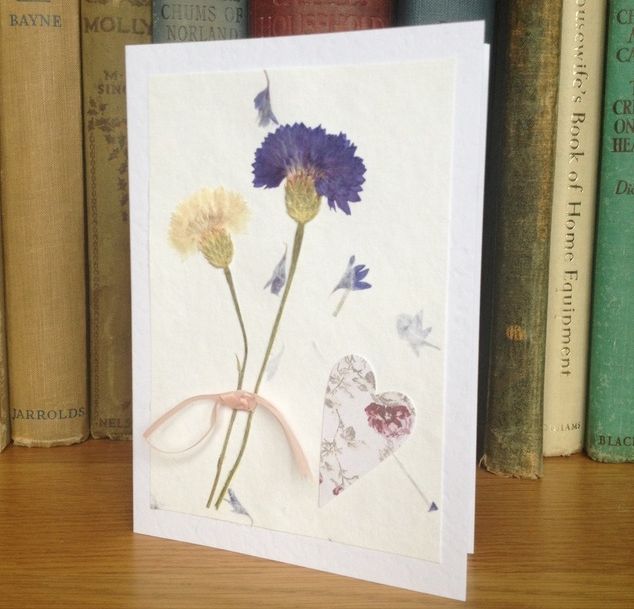
– Flowers of your choice (pressed, fabric or any type that are flat and can be glued down)
– Glue (the liquid variety)
– A small, old bowl or lid that you won’t need again
– A toothpick or small brush
– Other decorative items like glitter or confetti hearts
– Scissors
Instructions:
- You need to begin by planning the design you wish to create.
- Decide what type of flowers you wish to use. If you choose pressed flowers, you will need to choose them and press them in advance (a few weeks prior) in order to ensure that they are ready to be used. If you want to make your own paper flowers or fabric flowers, you should also make these in advance and store them. This way, you can take your time and you won’t be under any kind of pressure to get them done in a hurry.
- Don’t feel limited to choose one type of flower. You can mix pressed, artificial, paper and all kinds of mediums to create a truly abstract design that’s rich in texture and colour.
- After choosing and preparing your flowers, you will need to cut the cardboard to the desired size. An A5 folded in half is the usual size but you can make your card as large or small as you like. You need to use firm paper or else it won’t hold the weight of the flowers and it will be really floppy.
- Arrange the flowers on the card before you apply any glue. This will give you a visual idea of what your design will look like in the end. Feel free to take a photo of your design so that you can recreate it piece by piece when applying glue.
- Pour your glue into a bowl and use a toothpick or small brush to apply the glue to the back of the flowers.
- Paste each flower in place and remember that it’s perfectly fine if they overlap just like they would if they were fresh flowers in a vase.
- If you are creating multiple layers, make sure that you start with the bottom layer and allow it to dry properly before moving on to the next layer.
- You can then add accessories like glitter and hearts if you wish.
If you like, you can lightly decorate the interior of the card or you can leave it plain and simple with just your sincere and heartfelt message inside. Remember, write from the heart and don’t just copy some poem or romantic passage off the internet! Make it personal and meaningful!